Build a proposal in the workspace
When to use this
Use this guide when an event exists and you are ready to shape what the client will see: the arrangements, the creative direction, and the pricing.
What you need first
- an event with the client and dates set
- a rough idea of the arrangements the job needs
- your library priced, if you want recipes to drive the numbers
The proposal board
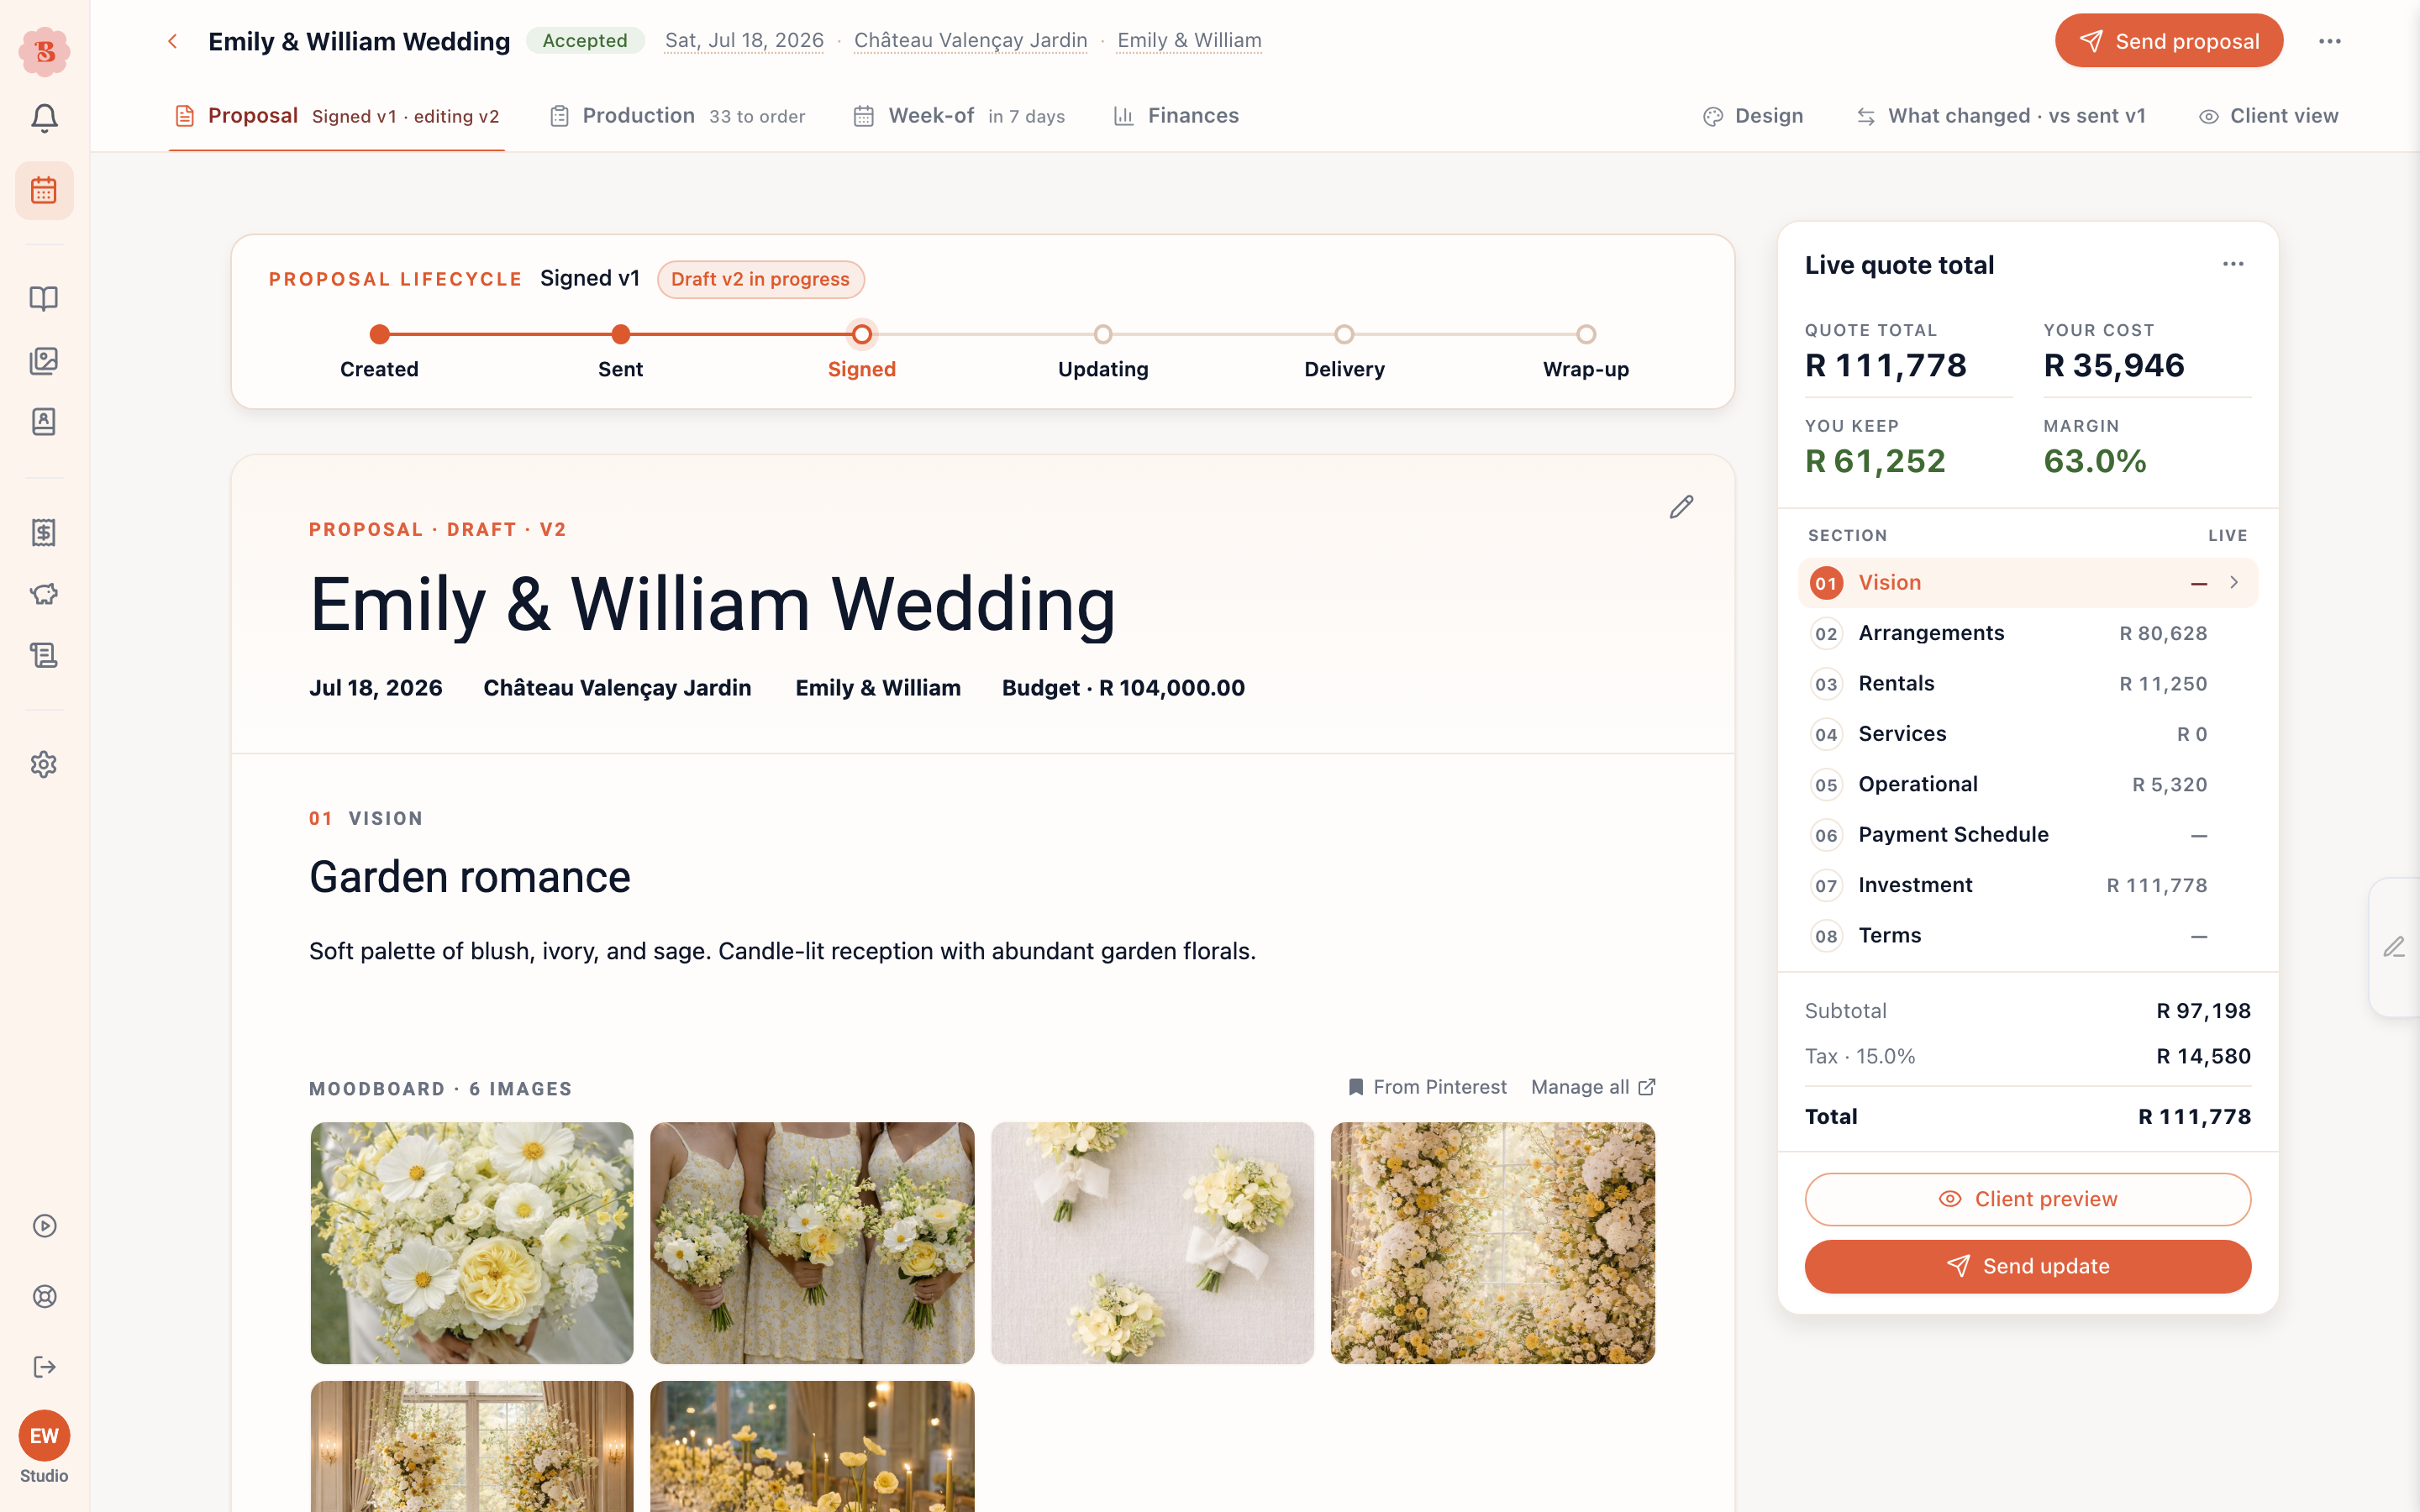
Open the event and choose the Proposal view. The board is organized into numbered sections that mirror the document your client receives: the details, vision, arrangements, rentals, services, operational costs, and payment schedule. Every section has an add button in its empty state, and the running totals sit in the rail beside the board.
The first time you open the board, a short video tutorial sits at the top. Watch it in place, or choose Got it to put the card away. After that, the Tutorial button in the event header keeps the video one click away whenever you need a refresher, and it always plays right on the page.
Step-by-step walkthrough
Add arrangements
Choose Add to under any group (such as Personal Flowers) and the composer opens with four ways to build, which you can mix freely:
-
The quick way is an estimate row: type a name, set the quantity and unit price, and choose Add estimate. Use it when you know the number and want to move fast. An arrangement with no recipe can carry either a typed cost, which your markup turns into the client price, or a price you set yourself: one or the other, so setting one clears the other. The assistant can set either when it adds arrangements for you.
-
Manual recipe opens the full builder: search your items by name or by describing what you want, set quantities, and add custom items that are not in your library yet. Each item brings its category and how you use it (used up, owned or rented) from your Library. On a phone, tap the star on an item’s row to add it to your Favorites.
-
Template pulls in an arrangement template you have saved before.
-
Smart builder works from a photo or a short description. Upload or paste a photo of an arrangement and it identifies the flowers and foliage it can see, then drafts a recipe from what is visible. It cannot see the back or sides of the piece, so it makes a best guess for those areas, and you may need to add stems or adjust quantities. A short note explains this the first time you use From image, and in that mode the info button beside the From image and Describe it toggle shows it again any time. Confirm to land in the builder, or discard and try again. On a phone, the photo area reads Tap to take or choose a photo.
The Smart builder is also available from the Production view. An arrangement you quoted without a recipe shows Create recipe with a small arrow beside it; choose Smart Recipe Builder from that arrow to fill that arrangement’s recipe rather than add a new one. Its name, quantity, quoted price and group stay as they were, and the name and description fields start with the arrangement’s own wording. The builder’s own wording waits in a Suggested by Smart Recipe Builder card under the fields with a Use button per line if you prefer it. Save recipe puts the stems on the arrangement and opens it in the builder.
On a phone, the composer has a Cancel button. Tap it to leave without adding the arrangement.
An arrangement with a recipe shows its measured cost marked From recipe. Type over it if you know better: the row switches to Set by you, the auto price follows your cost, and the recipe stays as it was. The use recipe cost link under the chip, on the board and in the arrangement editor’s cost summary, shows what the recipe measures right now (it moves as you edit ingredients); choose it to go back to that figure.
Quantities on the board and in the builder carry small up and down arrows when you hover or click into the number. Click an arrow to step by one, or hold it to keep counting. On the board the value saves when you let go; in the builder it saves a moment after you stop, so a run of clicks is one save. Either way the field keeps your cursor so you can carry on typing.
In the builder, each ingredient line shows its unit and its unit price, for example “5 stems · $2.00 a stem”, “¼ bunch · $8.00 a bunch” or “3 items · $1.50 each”. Type part of a bunch as a decimal, such as 0.25. Each line costs exactly what it uses: a quarter bunch costs a quarter of the bunch price. A bunch item also shows what the whole event needs, for example “In this event: 1½ bunches across 6 centerpieces. Orders buy 2.” The note “incl. wastage” shows only when the line has wastage. See Stems, bunches and leftovers.
If BloomBoard says “Rate limit reached”, that change was not saved and the number goes back to what was saved before. Wait the time the message shows, then make the change again.
If you build something worth reusing, use Save as Template in the arrangement editor’s menu so next time it is one click. The template keeps the cost or price you typed, so an estimate row with no recipe is worth saving too.
Refine the pricing line by line
Quantities, unit costs, and unit prices can be edited inline on each row. The numbers you can type into have a faint dashed line under them; the line total is plain text because it is worked out for you. Click a number to edit it, then press Enter or click away to save. A small chip shows where each price comes from: from the recipe, implied, set by you, or automatic. If you have overridden a price and want the recipe number back, one tap on the recipe price restores it.
On a phone or a small tablet, each arrangement shows as a card with its quantity, unit price and line total. Tap the card to open its details: use − and + for the quantity, type a cost or a price, and tap Done to save. The name, the description, Open recipe and the ⋯ menu are there too.
Ingredient prices work at the event level. A flower has one price for the whole event, called the event price, and every recipe line that uses the flower follows it. Edit a unit cost on any line and the event price moves: every arrangement that uses that flower updates at once. A bar along the bottom of the screen confirms the change, counts the arrangements it touched, and offers Undo and Only this arrangement.
Choose Only this arrangement when one design needs its own price, for example premium stems in the bridal bouquet. The line you edited keeps the new price and shows a small “This arrangement” tag, while every other arrangement returns to the event price. A tagged line never moves when the event price changes later. Click use event price under the line to bring it back in step.
Add the same flower to another arrangement later and it starts at the event price, not the library price. Your library is never changed by event pricing. Library prices only change when you choose Update Library in a price popover.
Check your margin at a glance
The cost summary in the arrangement builder shows a markup line with both numbers, for example “Markup 2.37× · 58% margin”. The value beside it is your profit per unit. Before a client accepts, the markup line hints in amber when a price you typed sits below your usual markup.
The Auto price in the builder uses the same rule as the proposal board. The builder groups the ingredients by your categories. The items you use up and the items you rent take their category’s markup. An item your studio owns adds its hire price, with no markup. The cost summary shows one row for each category, for example:
- Flowers $10.00 × 3.0 = $30.00
- Foliage $2.00 × 3.0 = $6.00
- Mechanics $1.50 × 2.0 = $3.00
- Décor (hired) $1.50 × 2.0 = $3.00
- Owned items, hire (no markup): $3.00
- Client price: $45.00
Set these markups for the event in Edit pricing rules, under Category markups. Change a markup there and every Auto price, chip and markup figure updates on the board and in the builder at once. Prices you typed yourself do not move. See Categories and markups.
After a client accepts, the quote becomes the reference. A “Quote allowed” box under Your cost compares your actual recipe cost with the cost your signed quote assumed. When the cost is under that budget, the box shows by how much, such as “20.00 under”. When the cost matches it exactly, the box reads “on budget”. It turns amber when the cost is over that budget, and red when the cost has used up the whole margin. An arrangement added after signing shows an implied budget instead, worked out from its price and your event markup.
When real supplier prices arrive through Orders, an “Ordered at” line can appear under Your cost. It shows what the same recipe costs at the ordered prices, with a tag naming the source, such as a quote or an invoice. It is information only: your recipe numbers never change from the Orders side.
A price can be zero. Set a unit price of 0 — in quick add or on the row — to gift an arrangement: the line stays on the proposal at 0.00, marked as set by you, and no other price moves. If you want the client to know it is complimentary, say so in the line’s description.
The name and description are editable in place too. Click the arrangement name to rename it: type the new name, then press Enter or click away to save, or Escape to cancel. The description sits right under the name: click it (or “Add description…” on an empty row) and type. Click away to save, press Escape to cancel, and use Enter when you want a new line. There is no need to open the full builder just to check or tweak what a line says.
Groups are just as direct. Drag rows between the groups on the page, or use the … menu on any row → Move to group… to file it under any of your groups — including one that is not on this event yet, or a brand-new group you name on the spot. On a phone, New group… shows a Create button: type the name and tap Create. On a phone or a small tablet, use Move up or Move down in a row’s … menu to reorder within a group. Click a group’s heading to rename it in place. See Arrangement groups for how renames behave across events.
To remove an arrangement, open the … menu on its row and choose Delete arrangement. The row leaves the proposal straight away and the totals update. A message with Undo shows for a few seconds: click it to put the arrangement back exactly where it was. Once a proposal has gone to your client, deleting asks you to create a revision first, so the version they have stays as it was.
The photo works the same way. Click an arrangement’s photo (or the empty photo tile) to open the image picker: choose from this event’s images or all your media, or upload from your computer inside the picker. The picture you replace stays in the arrangement’s gallery, so you can bring it back from the builder at any time.
Shape the vision
The Vision section holds the creative direction: a vibe title and description, a color palette, and the moodboard. Add from library opens a picker where you stage images from this event or all your media; a counter tracks how many of the six moodboard spots you have used. You can also upload directly from the picker.
From Pinterest puts pins from a public Pinterest board straight on the moodboard. Paste the board’s link, select Load board, pick up to as many pins as the moodboard has free spots, then select Add to moodboard (the button shows how many you picked). Pins already on the moodboard are greyed out. Pins already in the event are marked In this event; picking one puts it on the moodboard without importing it again. When all six spots are used, From Pinterest and Add from library are hidden. To bring in a whole board, use Import from Pinterest on the Media page (Manage all).
On a phone, Add color and a tap on a color open the color picker at the bottom of the screen. Drag to pick a color or type its hex code, add a name, then tap Add color or Done. If you hold your phone sideways, scroll the picker to reach the button.
On the Romantic Luxe, Modern Garden and Corporate Editorial designs, the vibe title is also the heading under Floral brief on the event overview page. To use a different heading there, click it in the design studio and type your own. A proposal you have already sent keeps the heading it was sent with.
Fill in rentals, services, and operational costs
Where you add a rented or owned item decides how it bills. One that you add inside an arrangement’s recipe is priced into that arrangement and never shows as its own row for the client. The Rentals section lists it in a quieter “In arrangement prices” strip, so you can still see it. One that you add directly in the Rentals section bills as its own row on the proposal. A rented item takes its category’s markup. An item your studio owns takes its client hire price, with no markup. Add standalone rentals, services, and operational costs in their own sections; each supports fixed amounts or percentages, and each section shows its own total.
Keep some lines for the studio only
A production-only arrangement, hire item or cost line is for your own planning, such as a spare bouquet or your team’s lunch. It counts in production and in your orders, and your margins count its cost, but it never shows on the client’s proposal or in its total.
- In the Production view, the add buttons have an On quote or Production-only choice. Choose Production-only. The row shows a Production-only chip.
- To move one onto the proposal, select Add to quote (the page icon) on its row. A sent proposal needs a revision first.
- You can also ask the assistant, for example “move the spare bouquet onto the quote”.
Reuse your usual services and costs
If you charge the same service or operational lines on most events, save them once and add them to any quote in a couple of clicks. Hover a service or cost row, open its … menu, and choose Save to your services (or Save to your costs). The line is kept exactly as it reads on that row: name, type, notes, and pricing. Saving a row whose name is already in your saved list updates that saved line instead of adding a second one, so you can refresh the wording or price from any quote.
To add saved lines to a quote, choose Add from saved beside Add service or Add cost. The button appears once you have saved at least one line. Nothing is ticked when the list opens: tick the lines you want and choose Add. Lines already on this quote are marked On this quote; tick one anyway if you really want a second copy. The rows land in the section like any other line, with the prices you saved, so change the amounts for this event as needed. Editing or removing a row on a quote never changes your saved list, and changing a saved line never touches quotes you have already built. To remove a saved line, hover it in the Add from saved list and choose the bin icon.
You can also ask the assistant to save a line to your saved services or saved costs, add saved lines to a quote, or copy every service and operational cost from another event in one step. Each change has Undo. The assistant can put the lines in a new order too: name them in the order you want.
Set the pricing rules
Open Edit pricing rules from the rail menu to reach markups, tax, discount, and planner commission. Category markups lists each of your categories, then Services and Operational costs. The pricing summary recomputes live as you change them, from base cost through to the final total and what you keep. Discounts can be typed as an amount or a percentage of the current subtotal. If a wedding planner takes a commission on this proposal, set it on the Commission tab. The client sees quietly marked-up prices while your board keeps showing your own; see Add a hidden planner commission.
New events start with the markups from Business → Categories and markups, including events that come from your enquiry form, a client brief or your assistant. A category that you add later joins an event, with its markup, the first time one of its items goes into the event. On the board, the Arrangements and Rentals sections show a Category markups chip. Hover it to see the markups in use, and click it to open Edit pricing rules.
On a draft, the assistant can make these changes for you, for example “take 10% off” or “make the flower markup 250% on this wedding”. It tells you the new total, and each change has Undo.
Check the payment schedule
The Payment Schedule section controls how the total splits into milestones, such as a deposit and a final balance. Start from your default schedule and adjust it for this event if needed.
The first milestone carries a Collect on acceptance switch. Leave it off and BloomBoard drafts the deposit invoice when the client signs, for you to review and send. Switch it on and the deposit is invoiced, emailed, and payable the moment they accept. Either way this only happens on an event with no live invoice; once you have raised one, the deposit is yours to send. The setting freezes when you send, so decide before sending. See Bill and get paid on an event. The assistant can change the deposit and the payment dates of a draft, or put your default schedule back.
What happens next
When the board looks right, review the totals in the rail, use Client view to see the document as the client will, and move on to sending the proposal. If you spot something to change while previewing, the Edit design button above the pages jumps straight into the design studio.
On a phone, Client view opens on Mobile, which fits your screen. Desktop shows the laptop layout. It is wider than a phone, so swipe sideways to see all of it.
Once a proposal is sent it locks, and every section shows a revision prompt instead of editing directly. That is deliberate: the client should always be looking at exactly what you approved. Create a revision when something needs to change.